Project 1: Flag Clash
1: First we opened our picture of the island of Cyprus and the flags of Northern Cyprus and Cyprus.
2: We then copied the original image 4times by using the control J shortcut.
3: Using the rectangular marquee tool we selected the flag of Cyprus and dragged it over to the island picture. (If you want your flag sizes to be more exact you can go to View-Show-Grid or press Ctrl+')You want to be sure you drag this onto layer 1 while all the other layers are transparent. After you drag if your image is too big you can use the control T tool to select the flag and make it smaller using the anchor tools.
4: We repeated the same steps as in step 3, this time with the Northern Cyprus flag and placed it onto the first layer.
5: After clicking the check button and still selected on the Northern Cyprus flag layer we went to the Layer tab and selected "Merge Down". We also did this with the Cyprus flag layer also. What this button does is combine the two layers into one image so Layer 1 now has the island and the two flags.
6: We then selected and made visible layer 1 copy 1 layer and deselected layer 1 while also making it transparent.
7: We repeated the processes done in steps 3,4, and 5 but this time making the flags bigger in size.
8: Again we repeated the processes done in steps 3,4, and 5 and again making the flags bigger. Now after this step we should have the Cyprus flag covering half of the picture and the Northern Cyprus flag covering the other half.
9: While activated on layer 1 copy 3 we want to copy it two more times.
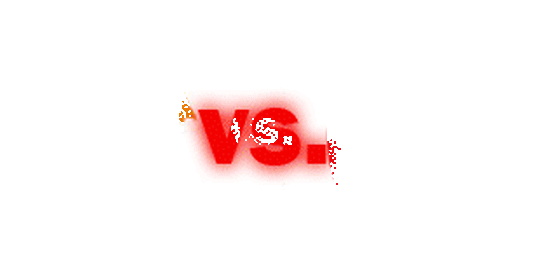
10: Now we are going to create the word "vs." in a 12 font size red color with the text box tool.
11: While still activated on the textbox layer, go to layer then layer styles and select outer glow. Make sure you are on normal mode and make sure the color of the glow is red. I also went to size and put it around 15. This will add a nice red glow to the text. Once done with the textbox and outer glow we are going to merge the layer down again.
12: We will repeat steps 10 and 11 on the next two slides except with a gradually increasing font.
13: Finally we go to windows then animation. When the 1st frame is selected you select to view only the first slide, you then create a new frame and select to view only the second slide, you continue this process till you have finished with all the slides. After pressing play, if the gif goes to fast you can click on the bottom of the frames and select a better time limit, for mine I chose .2 seconds.
2: We then copied the original image 4times by using the control J shortcut.
3: Using the rectangular marquee tool we selected the flag of Cyprus and dragged it over to the island picture. (If you want your flag sizes to be more exact you can go to View-Show-Grid or press Ctrl+')You want to be sure you drag this onto layer 1 while all the other layers are transparent. After you drag if your image is too big you can use the control T tool to select the flag and make it smaller using the anchor tools.
4: We repeated the same steps as in step 3, this time with the Northern Cyprus flag and placed it onto the first layer.
5: After clicking the check button and still selected on the Northern Cyprus flag layer we went to the Layer tab and selected "Merge Down". We also did this with the Cyprus flag layer also. What this button does is combine the two layers into one image so Layer 1 now has the island and the two flags.
6: We then selected and made visible layer 1 copy 1 layer and deselected layer 1 while also making it transparent.
7: We repeated the processes done in steps 3,4, and 5 but this time making the flags bigger in size.
8: Again we repeated the processes done in steps 3,4, and 5 and again making the flags bigger. Now after this step we should have the Cyprus flag covering half of the picture and the Northern Cyprus flag covering the other half.
9: While activated on layer 1 copy 3 we want to copy it two more times.
10: Now we are going to create the word "vs." in a 12 font size red color with the text box tool.
11: While still activated on the textbox layer, go to layer then layer styles and select outer glow. Make sure you are on normal mode and make sure the color of the glow is red. I also went to size and put it around 15. This will add a nice red glow to the text. Once done with the textbox and outer glow we are going to merge the layer down again.
12: We will repeat steps 10 and 11 on the next two slides except with a gradually increasing font.
13: Finally we go to windows then animation. When the 1st frame is selected you select to view only the first slide, you then create a new frame and select to view only the second slide, you continue this process till you have finished with all the slides. After pressing play, if the gif goes to fast you can click on the bottom of the frames and select a better time limit, for mine I chose .2 seconds.
Project 2: Gerrard!
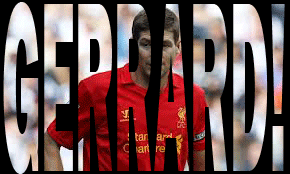
In this project I created three clipping masks of the same image and put them into a gif.
1: Get your background image and copy it onto another layer.
2: Create a new layer and make the background color either white or black, I chose black.
3: Create a textbox and write your word. Press the check button then Ctrl T and use the anchors to make the text fill up the image.
4: Place the copy of the background as the top layer. Then go to layer and press "Create Clipping mask", you should now be able to see the text through the background image.
5: Before you merge all the layers you want to again copy the background image and then immediately click to unview it. Next activate one of the layers that is being viewed, go to layer then choose "merge visible." This will create one layer that has the clipping mask and the transparent background copy.
6: After merging all of the visible you want to activate on the background image and copy it again. You will then repeat the steps 2-5. I repeated this process 2 more times creating 3 clipping masks.
7: You then want to go to windows-animation. On the first frame you make only the first layer visible, create a new frame and make only the second layer visible, again create a new frame and make only the third layer visible. If you choose to you can change the timing of how fast the frames go. For mine I chose .5 seconds.
Project 3: Hillsborough, Justice for the 96
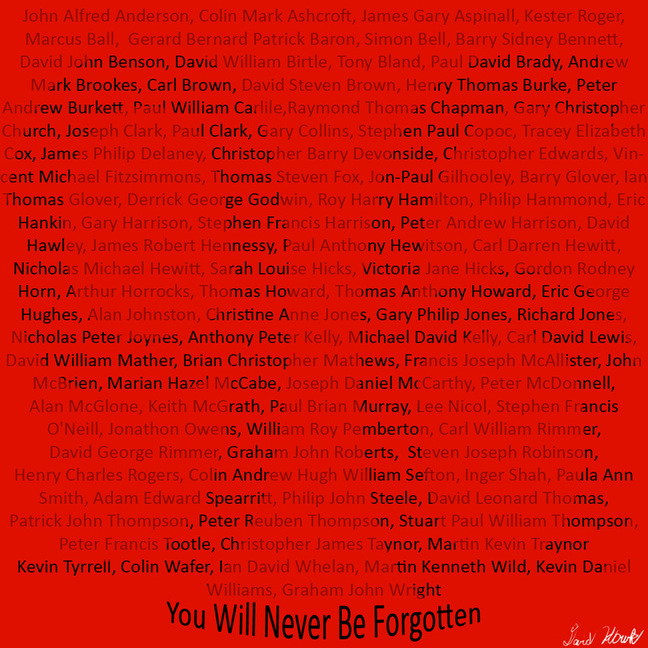
1: Use the text tool to make the number 96 fill up the 8'x8' layer. Merge the "96" layer with the background.
2: Create a new layer that is colored red.
3: Copy the names of the victims(found below), and place it into a text box that fills up the whole document.
4: Go to the bottom layer and use control A to select the whole layer then copy it.
5: Add a layer mask to the textbox layer.
6: Use Alt left click to select the new layer and click paste.
7: Use the text box tool to write "You Will Never Be Forgotten" in the bottom of the image. Use the Lower arc text warp on the textbox.
John Alfred Anderson, Colin Mark Ashcroft, James Gary Aspinall, Kester Roger,
Marcus Ball, Gerard Bernard Patrick Baron, Simon Bell, Barry Sidney
Bennett, David John Benson, David William Birtle, Tony Bland, Paul David
Brady, Andrew Mark Brookes, Carl Brown, David Steven Brown, Henry Thomas Burke,
Peter Andrew Burkett, Paul William Carlile,Raymond Thomas Chapman, Gary
Christopher Church, Joseph Clark, Paul Clark, Gary Collins, Stephen Paul Copoc,
Tracey Elizabeth Cox, James Philip Delaney, Christopher Barry Devonside,
Christopher Edwards, Vincent Michael Fitzsimmons, Thomas Steven Fox, Jon-Paul
Gilhooley, Barry Glover, Ian Thomas Glover, Derrick George Godwin, Roy Harry
Hamilton, Philip Hammond, Eric Hankin, Gary Harrison, Stephen Francis Harrison,
Peter Andrew Harrison, David Hawley, James Robert Hennessy, Paul Anthony
Hewitson, Carl Darren Hewitt, Nicholas Michael Hewitt, Sarah Louise Hicks,
Victoria Jane Hicks, Gordon Rodney Horn, Arthur Horrocks, Thomas Howard, Thomas
Anthony Howard, Eric George Hughes, Alan Johnston, Christine Anne Jones, Gary
Philip Jones, Richard Jones, Nicholas Peter Joynes, Anthony Peter Kelly, Michael
David Kelly, Carl David Lewis, David William Mather, Brian Christopher Mathews,
Francis Joseph McAllister, John McBrien, Marian Hazel McCabe, Joseph Daniel
McCarthy, Peter McDonnell, Alan McGlone, Keith McGrath, Paul Brian Murray, Lee Nicol, Stephen Francis O'Neill, Jonathon Owens, William Roy Pemberton, Carl William Rimmer, David George Rimmer, Graham John Roberts, Steven Joseph
Robinson, Henry Charles Rogers, Colin Andrew Hugh William Sefton, Inger Shah,
Paula Ann Smith, Adam Edward Spearritt, Philip John Steele, David Leonard
Thomas, Patrick John Thompson, Peter Reuben Thompson, Stuart Paul William
Thompson, Peter Francis Tootle, Christopher James Taynor, Martin Kevin
Traynor, Kevin Tyrrell, Colin Wafer, Ian David Whelan, Martin Kenneth Wild,
Kevin Daniel Williams, Graham John Wright
Project 4: United States-Cyprus Comparison
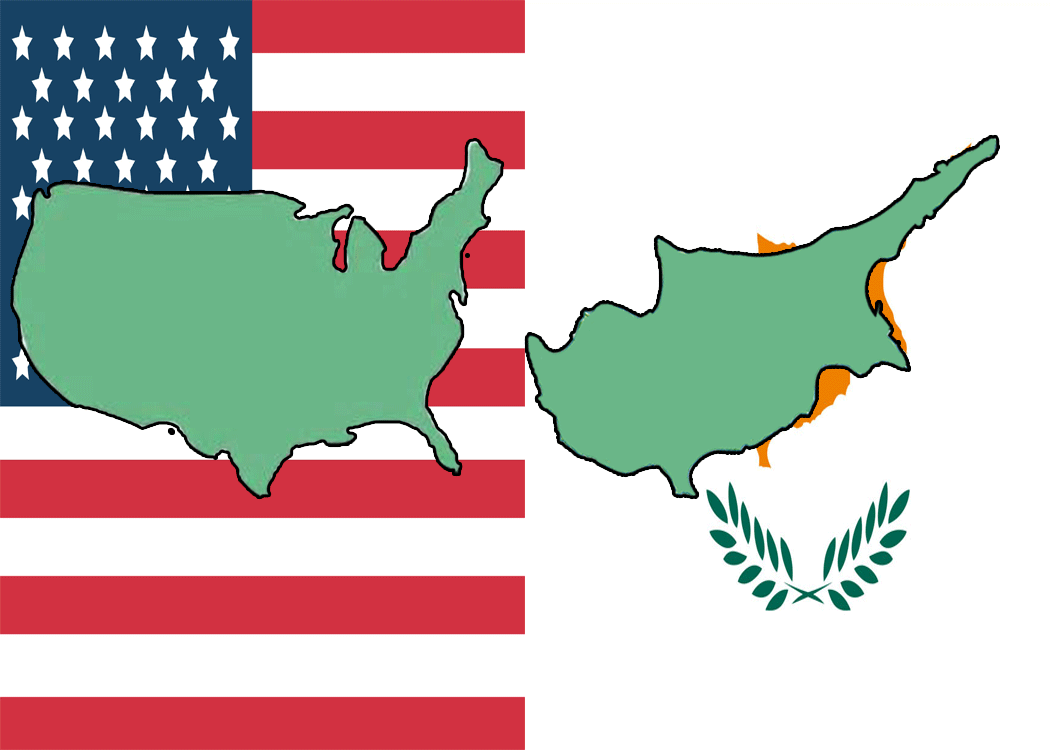
1: Place the Cyprus and American Flags as the background of the document.
2: Copy the United States onto a new layer and make it a mint color. Add a black stroke around the image.
3: Copy Cyprus onto a new layer and make it the mint color. Add a black stroke around the image.
4: Copy the Cyprus layer twice, on each layer move the image of Cyprus so where it is closer to looking like the United States.
5: Write "Coincidence? I think not" in a textbox. Add a red stroke around the text.
6: Place the United States with its own Cyprus layer on their own frames.
